Json and Xml parser API using API Management

Hi Readers, this is a very common scenario in integration where you need an API to transform xml to json or json to xml. I have also faced this in my recent project where all our developers needed a common API to do so. So, I came up with an idea whereby using API Management policy we can build such API in no time. Since our team was already using API management to share and host their APIs, this little xml <-> json parser was easy to share across.

Scenario

Json to Xml

Xml To Json

Http Method

Post

Post

Headers

Content-Type: application/json

sourceformat: json

destinationformat: xml

Ocp-Apim-Subscription-Key: yoursubscriptionkey

Content-Type: application/json

sourceformat: json

destinationformat: xml

Ocp-Apim-Subscription-Key: yoursubscriptionkey

Body

{

“hello”: “world”    

}

<Document>

<hello>world</hello>

</Document>

Expected Output

<Document>

<hello>world</hello>

</Document>

{

“hello”: “world”    

}

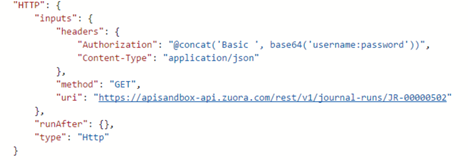
So, we have built an API called Format Conversion, which is will take sourceformat and targetformat as an input, along with the body of the request and do the conversion.

Now, add an operation in an API in api management with name FormatConversion like below:

We will add the following policy under Inbound Processing section of the API operation in API Management.

<policies>
    <inbound>
        <base />
        <choose>
            <when condition="@(context.Request.Headers["sourceformat"][0].ToLower()=="xml" && context.Request.Headers["destinationformat"][0].ToLower()=="json")">
                <xml-to-json kind="direct" apply="always" consider-accept-header="false" />
                <return-response>
                    <set-status code="200" />
                    <set-header name="Content-Type" exists-action="override">
                        <value>application/json</value>
                    </set-header>
                    <set-body>@(context.Request.Body.As<string>())</set-body>
                </return-response>
            </when>
            <when condition="@(context.Request.Headers["sourceformat"][0].ToLower()=="json" && context.Request.Headers["destinationformat"][0].ToLower()=="xml")">
                <json-to-xml apply="always" consider-accept-header="false" parse-date="false" />
                <return-response>
                    <set-status code="200" />
                    <set-header name="Content-Type" exists-action="override">
                        <value>text/xml</value>
                    </set-header>
                    <set-body>@(context.Request.Body.As<string>())</set-body>
                </return-response>
            </when>
            <otherwise>
                <return-response>
                    <set-status code="400" />
                    <set-header name="Content-Type" exists-action="override">
                        <value>application/json</value>
                    </set-header>
                    <set-body template="liquid">
                        {
                           "message":"Invalid request parameters."
                        }
                        </set-body>
                </return-response>
            </otherwise>
        </choose>
    </inbound>
    <backend>
        <base />
    </backend>
    <outbound>
    </outbound>
    <on-error>
        <base />
    </on-error>
</policies>

Now, save the policy and test it. If you are struggling with anything in this, post a comment and I will reply as soon as I can.

Soap Connector in Logic Apps (Passthrough)


We usually have the requirement to leverage an existing soap service sitting on premises using Azure logic apps. I also came across such requirements in one of the projects. So how I did it, details are below:

I have created this as a passthrough connector for just to re-use existing request messaging payloads, intention to simulate the soap service call and try not to do anything fancy.

  1. Create a logic app custom connector with pass through option.
  • Login to Azure portal and create a new logic app custom connector with the name of your soap service.


  • Now go to the just created logic app custom connector and click edit.

General section


  • You can upload connector icon of your choice, which will be displayed when used in logic apps.
  • Make sure you select the ‘Connect-via on-premises data gateway’ option if the the soap service is deployed in an on-premise server/private network.
  • Now lets suppose, the Url of your soap service is like this http://10.1.0.91/training/apps/data.svc.
  • Then Host must be 10.1.0.91, which is the IP address of the server where the soap service sits.
  • then the Base url in the connector should be /training/apps (exclude data.svc part for now)
  • go to next page which is security.

Security section

Skip this step if your soap service has a separate login call to get the session token or authorization token. Otherwise, select the right authentication option that your soap service needs.

Definition section


  • When you configure this section, I would recommend you go directly to the swagger editor option, enable it and copy the below code (also, verify the highlighted fields below according to your soap service parameters):


  • Click on Update Connector.

2. Create logic app and test.

  • Create a new logic app to test the connector.
  • Add an action in the logic app and search by the connector name:


  • Select the SoapPassThrough action
  • The connection will be created, if authentication is selected , then it will ask for the details.
  • Now in the body section, just copy the request body of the soap.


  • Save and run the logic app to test.

Using regular expressions using JavaScript inline code action in logic apps

Hi Folks,

With this new feature of Azure logic apps called execute inline JavaScript code, I am trying to validate an email using regular expression in the request content. Let’s see:

This is the action I am talking about:

Steps:

  1. First create and link your integration account to the logic app. Read more about integration account, read more on https://docs.microsoft.com/en-us/azure/logic-apps/logic-apps-enterprise-integration-create-integration-account
  2. My Logic App Designer:

  3. Logic App Code:

  4. Sample Request and Response:
Request type Request Response
Valid Email

{

“FirstName”:”Sovit”,

“LastName”:”Charak”,

“Email”:”sovit.charak@gmail.com”

}

true
Invalid Email

{

“FirstName”:”Sovit”,

“LastName”:”Charak”,

“Email”:”sovit.charak_gmail.com”

}

false


Any questions, please leave them in the comments section.

Why Customer would need ISE (integration service environment)

It has been a month that the ISE offering from Microsoft’s logic app team is out in the market for public preview and a lot of my customers are asking me to go for it or not. I have advised them based on some factors which I am also going to discuss on this blog post. But first, let’s understand what ISE is.

The above diagram will explain a lot about ISE and it is also one of the example of high level architecture that I usually recommend, when you are going for ISE.

Definition

In simple words, ISE is a dedicated environment to run the logic apps and this environment is guarded under a network with virtual network configuration capabilities in it. Read more

Why to choose:

  • Growing Middleware cost and requirements to shift to fixed price model.
  • More control on logic app’s environment scalability, own custom domain and network configurations.
  • Stop public access of logic apps.
  • Need direct and fast access to on-premise resources. In that case, ISE network configuration can leverage express route.
  • Simplify and minimising use of custom logic app connectors to access on- premise resources.
  • Secure the integration account containing Schemas, Maps, EDI-Partner agreements from public access.
  • Isolated environment to solve noisy neighbour problem. Where in a shared environment there is a possibility of one service impacting others. Read more about this problem.

Why not to choose:

  • If you are currently happy with what you have and don’t have above pressing needs or problems.
  • You will lose the benefits that a consumption plan offers like pay as you go and auto scale. If your integration requirements are very limited, then it is wise to do not go for ISE.
  • Not available for production use yet. I am not sure about when it is going to be available but what I heard, it’s going to be available soon in few months (I hate this line). But if you are in rush and must go-live soon then go for public offering of logic apps.

Pricing

  • The price for base unit, which includes standard integration account and one enterprise connector will cost around $3327 AUD monthly.
  • But one can scale up the base unit to three additional units by paying extra $1667 AUD monthly. This is only required in some specific scenarios
Please leave your comments below if you need any assistance with ISE  related queries.

Add HTTP Headers with basic authorization in logic apps

Hi Readers,

I have come across a situation where I had to use header with basic-authentication and few others custom key-values to make a http call and get data. It’s very simple, let’s try this:

  1. You need to put the header’s key value pairs in a json format, for e.g.

Key-Value

Json Format

Content-Type: application/json

{“Content-Type”: “application/json”}

Content-Type: application/json

Host: prod-05.westus.logic.azure.com:443

{“Content-Type”: “application/json”,

“Host”:”prod-05.westus.logic.azure.com:443″}


  1. Now we will use same above format of headers in Json format to make a http request to an API using logic apps:

  2. See the code-view window as well:

  1. Keep adding your other headers also in the same json format as we did in step 3 for “Authorization” and “Content-Type”.


BizTalk Unit Testing – Maps with or without external assembly and XSLT

Hi Readers,

BizTalk unit testing is not difficult to implement using Microsoft Test Framework. I will mention few easy steps to do it.

  1. The unit test project template is available from Visual studio 2010. If yours Visual Studio version is older than 2010, then please upgrade it first to at least to 2010 or later.
  2. Before creating any unit test project, Enable the unit testing of the BizTalk projects in project properties, save and build the project.

  3. Now, add a new project using visual studio to the solution and select template type “Unit Test Project” and create a project with valid name (Skip the step, if you have already created unit test project).
  4. Add a new class with name “MapTest.cs” or as per your choice.
  5. Add reference of the Schema and Map BizTalk projects in the unit test project. In my case it would be “Demo.BizTalk.Schemas” and “Demo.BizTalk.Maps”.
  6. Make sure that the Unit test project should have other references also, see the screenshot below:

  7. If you are referring external assembly in your map, then add the extensions file into your unit test project. I have added it in the References folder.
  8. Note that the extension file is obtained, when you validate the map and two files are generated one is XSLT and the other one is the .*xml extensions file. Copy that file into your unit test project.

  9. Denote your class to be “[TestClass]” and methods inside with “[TestMethod]”.
  10. Now, I will create a method for positive testing of map.
  11. Positive testing means, I will test a valid instance of Map.
  12. Now I will add a folder structure in the project “Maps/SampleOrders” and add all the test files to be tested in the folder.

  13. Don’t forget to add prefixes Negative/Positive in the filenames, it will distinguish the negative and positive test samples.
  14. So I have created a method for positive testing of Map. Check the code below


  15. Now build the solution.


  16. Please note that if you are not referring


  17. Now, if you are lucky then go to test->run->all* in the Menu bar of visual studio and run all test cases.


  1. Let me know if you are stuck in comments. Usually I am very promptJ.
  2.  


BizTalk Unit Testing – Schemas

Hi Readers,

BizTalk unit testing is not difficult to implement using Microsoft Test Framework. I will mention few easy steps to do it.

  1. The unit test project template is available from Visual studio 2010. If yours Visual Studio version is older than 2010, then please upgrade it first to at least to 2010 or later.
  2. Before creating any unit test project, Enable the unit testing of the BizTalk projects in project properties, save and build the project.

  3. Now, add a new project using visual studio to the solution and select template type “Unit Test Project” and create a project with valid name.
  4. Delete the default class created with name “UnitTest1.cs”. Add a new class with name “SchemaTest.cs” or as per your choice.
  5. Add reference of the schema project (where schemas are present) in the unit test project. In my case it would be “Demo.BizTalk.Schemas”.
  6. Add an assembly as reference “C:\Program Files (x86)\Microsoft BizTalk Server 2013 R2\Developer Tools\Microsoft.BizTalk.TestTools.dll” and C:\Program Files (x86)\Microsoft BizTalk Server 2013 R2\Microsoft.XLANGs.BaseTypes.dll.
  7. Use your schema project namespace and visual studio test tools namespace in the class “SchemaTest”.


  8. Denote your class to be “[TestClass]” and methods inside with “[TestMethod]”.
  9. Now, I will create two methods, negative testing and positive testing.
  10. Positive testing means, I will test a valid instance of schema and Negative testing means I will test all invalid instances of schema.
  11. Now I will add a folder structure in the project “Schemas/SampleOrders” and add all the test files to be tested in the folder.

  12. Don’t forget to add prefixes Negative/Positive in the filenames, it will distinguish the negative and positive test samples.
  13. Now add few references
  14. So I have created two methods, one for positive testing and one for negative. Check the code below


  15. Now build the solution.


  16. Now, if you are lucky then go to test->run->all* in the Menu bar of visual studio and run all test cases.


  1. Let me know if you are stuck in comments. Usually I am very promptJ.
  2.  


How to use Rest APIs of Azure IoT Hub

IoT hub is a kind of managed service where billions of IoT devices can be provisioned and managed. I faced one challenge when I had to send device data to cloud IoT hub by using azure functions. I couldn’t use the IoT hub’s built-in SDK and then the other way around was to use Rest APIs of azure IoT hub. In this scenario, let’s see how what should be the request message with header info and endpoint url would look like.

  1. To Get all Devices


static
async
Task<string> GetDevicesAsync()

{


var token = “SharedAccessSignature sr=myiothub.azure-devices.net&sig=WzrFLgkGnhvkJeR%2fF7sh5p%2bobE9ZVHMObNlf%2bKBF2HA%3d&se=1496930912&skn=iothubowner”;


using (var client = new
HttpClient())

{


client.BaseAddress = new
Uri(https://myiothub.azure-devices.net/&#8221;);

client.DefaultRequestHeaders.Accept.Clear();

client.DefaultRequestHeaders.Accept.Add(new
MediaTypeWithQualityHeaderValue(“application/json”));

client.DefaultRequestHeaders.TryAddWithoutValidation(“Authorization”, token);


HttpResponseMessage response = await client.GetAsync(string.Format(“devices?top=100&api-version=2016-02-03”));


if (response.IsSuccessStatusCode)

{


var res = await response.Content.ReadAsStringAsync();


return res;


}


return
null; //result;


}


}

Header

URL

Request Message

Accept: application/json

Authorization: SharedAccessSignature sr= myiothub.azure-devices.net&sig=WzrFLgkGnhvkJeR%2fF7sh5p%2bobE9ZVHMObNlf%2bKBF2HA%3d&se=1496930912&skn=iothubowner

https://<yourIoThub&gt;.azure-devices.net/devices? top=100&api-version=2016-02-03

e.g.:

https://myiothub.azure-devices.net/devices?top=100&api-version=2016-02-03

{Method: GET, RequestUri: ‘https://myiothub.azure-devices.net/devices?top=100&api-version=2016-02-03&#8217;, Version: 1.1, Content: <null>, Headers:

{

Accept: application/json

Authorization: SharedAccessSignature sr= myiothub.azure-devices.net&sig=WzrFLgkGnhvkJeR%2fF7sh5p%2bobE9ZVHMOblf%2bKBF2HA%3d&se=1496930912&skn=iothubowner

}}


  1. To get a Particular Device


static
async
Task<string> GetDevice(string deviceId)

{


var token = “SharedAccessSignature sr=Myiothub.azure-devices.net&sig=WQrFLggGnhvkJeR%2fF7sh5p%2bobE9ZVHMObNlf%2bKBF2HA%3d&se=1496930912&skn=iothubowner”;


using (var client = new
HttpClient())

{


client.BaseAddress = new
Uri(https://Myiothub.azure-devices.net/&#8221;);

client.DefaultRequestHeaders.Accept.Clear();

client.DefaultRequestHeaders.Accept.Add(new
MediaTypeWithQualityHeaderValue(“application/json”));

client.DefaultRequestHeaders.TryAddWithoutValidation(“Authorization”, token);


HttpResponseMessage response = await client.GetAsync(string.Format(“devices/{0}?api-version=2016-02-03”, deviceId));


if (response.IsSuccessStatusCode)

{


var res = await response.Content.ReadAsStringAsync();


return res;


}


return
null; //result;


}


}

Header

URL

Request Message

Accept: application/json

Authorization: SharedAccessSignature sr= myiothub.azure-devices.net&sig=WzrFLgkGnhvkJeR%2fF7sh5p%2bobE9ZVHMObNlf%2bKBF2HA%3d&se=1496930912&skn=iothubowner

https://<yourIoTHub&gt;.azure-devices.net/devices/<DeviceID>? api-version=2016-02-03


e.g.:

https://myiothub.azure-devices.net/devices/PressureSensor?api-version=2016-02-03

{Method: GET, RequestUri: ‘https://myiothub.azure-devices.net/devices/PressureSensor?api-version=2016-02-03&#8217;, Version: 1.1, Content: <null>, Headers:

{

Accept: application/json

Authorization: SharedAccessSignature sr=Myiothub.azure-devices.net&sig=WQrFLggGnhvkJeR%2fF7sh5p%2bobE9ZVHMbNlf%2bKBF2HA%3d&se=1496930912&skn=iothubowner

}}


  1. To add a new device

    static
    async
    Task<string> AddDeviceAsync(string newDeviceId)

    {


    string result = string.Empty;


    var token = “SharedAccessSignature sr=Myiothub.azure-devices.net&sig=WQrFLggGnhvkJeR%2fF7sh5p%2bobE9ZVHMObNlf%2bKBF2HA%3d&se=1496930912&skn=iothubowner”;


    using (var client = new
    HttpClient())

    {


    client.BaseAddress = new
    Uri(https://Myiothub.azure-devices.net/&#8221;);

    client.DefaultRequestHeaders.Accept.Clear();

    client.DefaultRequestHeaders.Accept.Add(new
    MediaTypeWithQualityHeaderValue(“application/json”));

    client.DefaultRequestHeaders.TryAddWithoutValidation(“Authorization”, token);


    var dataToPost = new

    {

    deviceId = newDeviceId,

    authentication = new

    {

    symmetricKey = new

    {

    primaryKey = “”,

    secondaryKey = “”


    }

    },

    status = “”,

    statusReason = “”

    };


    //var jsonData = JsonConvert.SerializeObject(dataToPost, Formatting.Indented);


    var content = new
    StringContent(JsonConvert.SerializeObject(dataToPost), Encoding.UTF8, “application/json”);


    HttpResponseMessage response = await client.PutAsync(string.Format(“devices/{0}?api-version=2016-02-03”, newDeviceId), content);


    if (response.IsSuccessStatusCode)

    {


    var res = await response.Content.ReadAsStringAsync();


    }


    return
    null; //result;


    }


    }

Header

URL

Request Message

Accept: application/json

Authorization: SharedAccessSignature sr= myiothub.azure-devices.net&sig=WzrFLgkGnhvkJeR%2fF7sh5p%2bobE9ZVHMObNlf%2bKBF2HA%3d&se=1496930912&skn=iothubowner

Content-Type: application/json; charset=utf-8

Content-Length: 126

https://<DeviceID&gt;.azure-devices.net/devices/<DeviceID>


e.g.:

https://myiothub.azure-devices.net/devices/PressureSensor

{Method: PUT, RequestUri: ‘https://myiothub.azure-devices.net/devices/PressureSensor?api-version=2016-02-03&#8217;, Version: 1.1, Content: System.Net.Http.StringContent, Headers:

{

Accept: application/json

Authorization: SharedAccessSignature sr=Myiothub.azure-devices.net&sig=WQrFLggGnhvkJeR%2fF7sh5p%2bobE9ZVMObNlf%2bKBF2HA%3d&se=1496930912&skn=iothubowner

Content-Type: application/json; charset=utf-8

Content-Length: 126

}}

  1. To send message to a device


static
async
Task<string> SendMessageAsync(string newDeviceId,JObject message)

{


string result = string.Empty;


var token = “SharedAccessSignature sr=Myiothub.azure-devices.net&sig=WQrFLggGnhvkJeR%2fF7sh5p%2bobE9ZVHMObNlf%2bKBF2HA%3d&se=1496930912&skn=iothubowner”;


var CorrelationId = newDeviceId + “_Sensor_” + message[“url”].ToString().Split(‘/’).Last();


var messageID = CorrelationId+“_”+DateTime.Parse(message[“current_value_time”].ToString()).ToString(“yyyyMMddhhmmss”);


var user = newDeviceId;


using (var client = new
HttpClient())

{

client.BaseAddress = new
Uri(https://Myiothub.azure-devices.net/&#8221;);

client.DefaultRequestHeaders.Accept.Clear();

client.DefaultRequestHeaders.Accept.Add(new
MediaTypeWithQualityHeaderValue(“application/json”));

client.DefaultRequestHeaders.TryAddWithoutValidation(“Authorization”, token);

client.DefaultRequestHeaders.TryAddWithoutValidation(“IoTHub-MessageId”, messageID);

client.DefaultRequestHeaders.TryAddWithoutValidation(“IoTHub-CorrelationId”, CorrelationId);

client.DefaultRequestHeaders.TryAddWithoutValidation(“IoTHub-UserId”, user);


// var content = new StringContent(message, Encoding.UTF8, “application/json”);


HttpResponseMessage response = await client.PostAsJsonAsync(string.Format(“devices/{0}/messages/events?api-version=2016-02-03”, newDeviceId), message);


if (response.IsSuccessStatusCode)

{

result = await response.Content.ReadAsStringAsync();


}


DateTime.Now.ToString();


return result; //result;


}


}

Header

url

Request Message

Accept: application/json

Authorization: SharedAccessSignature sr=Myiothub.azure-devices.net&sig=WQrFLggGnhvkJeR%2fF7sh5p%2bobE9ZVHMObNlf%2bKBF2HA%3d&se=1496930912&skn=iothubowner

IoTHub-MessageId: PressureSensor_11_Sensor_1_20160701115000

IoTHub-CorrelationId: PressureSensor_11_Sensor_1

IoTHub-UserId: PressureSensor_11

Content-Type: application/json; charset=utf-8

Content-Length: 346

https://<YourIoTHub&gt;.azure-devices.net/devices/<DeviceID>

e.g.:

https://myiothub.azure-devices.net/devices/PressureSensor

{Method: POST, RequestUri: ‘https://myiothub.azure-devices.net/devices/PressureSensor_11/messages/events?api-version=2016-02-03&#8217;, Version: 1.1, Content: System.Net.Http.ObjectContent`1[[Newtonsoft.Json.Linq.JObject, Newtonsoft.Json, Version=6.0.0.0, Culture=neutral, PublicKeyToken=30ad4fe6b2a6aeed]], Headers:

{

Accept: application/json

Authorization: SharedAccessSignature sr=Myiothub.azure-devices.net&sig=WQrFLgGnhvkJeR%2fF7sh5p%2bobE9ZVHMObNlf%2bKBF2HA%3d&se=1496930912&skn=iothubowner

IoTHub-MessageId: PressureSensor_11_Sensor_1_20160701115000

IoTHub-CorrelationId: PressureSensor_11_Sensor_1

IoTHub-UserId: PressureSensor_11

Content-Type: application/json; charset=utf-8

Content-Length: 346

}}


Use external assemblies and refer csx scripts in Azure Functions

Hi Readers,

Azure functions are new addition to the Azure stack. The use of azure functions is similar to the function which we use in any other programming language. An azure functions comes with the code window, which gives more control to a developer and support lots of renowned programming languages like C#, NodeJS. I will give an example on how to start developing azure functions and when there is a need to import and use custom assemblies from outside environment.

“Functions are reusable piece of code and should be easily used by large number of applications.”

In this example, I will create a function which will call a weather API to get the data and store that into a blob storage for further analysis.

  1. Login to Azure portal http://portal.azure.com
  2. Select appropriate subscription.
  3. Click on New(+)->Web+Mobile->Function App
  4. Fill the details and click on create.
  5. Function apps are the web apps which contains the Azure functions.
  6. Click on +New Function to create new function

  7. This will give me a large set of templates to choose and I will choose C# manual trigger to begin with. You can choose node JS template if you are not comfortable in C#. Choosing manual trigger ensures that you can trigger or use the function anytime with a manual press on the run button inside the function’s code window.
  8. Write your code in the Run function, which is the entry point of the function.
  9. I have created the function with the name GetWeatherData.

  10. I will extract the weather data and create a custom json object and return it back.
  11. Note that for creating a json object, I have to refer Newtonsoft assembly from outside environment.
  12. To load any external assembly and refer it in the functions, you need to go through the following steps:
    1. Open a new tab in the browser with url (replace place holder with your settings) https://<FunctionAppName&gt;.scm.azurewebsites.net/
    2. This will open Kudu portal. Go to Debug Console(Powershell) -> site -> wwwroot -> <YourFunction>
    3. You will see the function.json file, run.csx files in it.
    4. Here, drag and drop the assembly from your computer’s local folder to the kudu location that we have just opened.
    5. You will see the dll/assembly uploaded into the folder.

    6. Now you uploaded the assembly, now load that into your function in the code window using #r pre-processor directive.

    7. Now the Newtonsoft assembly is ready to use
  13. Note that I have also used #load directive to load the other function code. You can load other csx files in your csv file and use functions and variables from the loaded file.
  14. My function to call api was stored in Common.csx, which is the other function file and I just referred that function’s csx file, rather rewriting the code.
  15. I have written a piece of code to extract the weather data from an api and store this into a json object.
  16. Now I will add the output as Blob storage container and store the output in a file.
  17. Go to Integrate tab and click on + (New Output) and select Azure Storage Blob.

  18. Mention the Storage account connections. Select the appropriate storage account within the same region.
  19. Mention the Blob parameter name as the output variable from the run procedure of your function. In my case it will be jobject.
  20. Mention the path as <ContainerName>/<Filename>.

  21. Now run the function and check the output.

Xml Parsing in Logic Apps

Hi Readers,

Logic apps enforces json based message data processing, you can relate this concept with the BizTalk Server where xml based data processing standards are being enforced:

Applications Data Processing Standard
BizTalk XML
Logic Apps JSON

In BizTalk, it is very easy to parse json data into xml. There is a built-in pipeline available in Microsoft BizTalk Server 2013 Edition to implement this, but it gets tricky when you have to do the similar thing in a logic app. I am going to show you an example on how to parse json data into xml in logic apps…

  • In my example, I have created a custom API, which returns a list of employee names in a form of json data.

  • My objective is to create a text file in a blob container with a name of “Sovit.txt” and it should contain the data in the xml form of the above employee names, using a Logic App.

  • It took a fair amount of time to figure out how to do this and I am sharing this with you to save your precious time.
  • I have created a logic app with a name of TestEmployeeApp and it has three easy steps:

  • First step is a manual trigger, which I will be using to call/trigger this logic app, manually. Second step is an action, that calls a custom api, which returns the employee names data in Json. Third and final step is an action, which will create a file in a Blob container.
  • Note: that I have used predefined xml function of WDL, to parse json data into xml.
  • Note: In function xml (), you can only give one json property at a time. Multiple json objects or json object with multiple properties cannot be converted in a single go.
  • I had three employees to parse, so let’s see how I did it.

  • The above image is the third step of my logic app, I have created xml data with a root node of “Data” along with the concatenation of xml result of each json object one by one. Please see the highlighted code above.
  • ‘concat’ is a string function used to combine all the string values together.
  • Note: in the xml function, the input parameter is the single json object from the body of the action ‘Employee_Get’.
  • I have used the xml function thrice because I had three json objects to parse. If you have multiple json objects, you can use ‘forEach’ loop to loop over and convert each item to xml using the xml function.
  • Finally, I have assigned the output xml data to the body of the action, which creates a file in the blob container with the name “sovit.txt”, See the picture above.
  • You can download the complete code through this link http://sovitstorage.blob.core.windows.net/logicappcode/EmployeeXmlParse.txt.
  • Let me know if you are facing any issues with xml parsing in logic apps and BizTalk.